डिस्पैच मैनेजमेंट सिस्टम
Odoo में dispatch management system फ़ीचर का इस्तेमाल शिपमेंट प्लान और बिल्ड करने के लिए किया जाता है। मुख्य फ़ीचर में शामिल हैं:
Load building: स्पेसिफिक कैरिअर के लिए प्रॉडक्ट ग्रुप करें, उन बैच को लोडिंग डॉक पर असाइन करें, और फ्लीट कैपेसिटी के आधार पर व्हीकल असाइनमेंट मैनेज करें। यह सुनिश्चित करता है कि सही प्रॉडक्ट डिलीवरी के लिए उपयुक्त ट्रक में पैक किए गए हैं।
Fleet management: इन-हाउस डिलीवरी व्हीकल की कैपेसिटी ट्रैक और मैनेज करें।
कॉन्फ़िगरेशन
dispatch management system इस्तेमाल करने के लिए, निम्नलिखित सेटअप पूरा होना चाहिए:
Fleet ऐप्लिकेशन इंस्टॉल करें।
Inventory ऐप में जरूरी फ़ीचर एनेबल करें।
Enable and configure the Mapbox integration.
व्हीकल कैपेसिटी (वॉल्यूम और वेट) कॉन्फ़िगर करें।
Enter vehicle car models.
व्हीकल को डिलीवरी मेथड के रूप में सेट अप करें।
डॉक लोकेशन बनाएं।
महत्त्वपूर्ण
Dispatch management can evaluate capacity on a vehicle only if a weight and volume are assigned to a product on the Inventory tab of its product form.
इन्वेंट्री सेटिंग
To set the required inventory settings, navigate to .
In the Operations section, select the Batch, Wave & Cluster Transfers checkbox to prepare batches of orders for delivery.
In the Shipping section, select the Delivery Methods and Dispatch Management System checkboxes. Doing so allows specific vehicles to be set as carriers.
In the Warehouse section, select the Storage Locations checkbox to assign specific locations in the warehouse as loading zones for delivery trucks.
फिर, एक बार सभी कॉन्फ़िगरेशन पूर्ण हो जाने पर, सेव करें पर क्लिक करना सुनिश्चित करें।
Mapbox integration
Next, configure the Mapbox integration.
First, create a Mapbox account. If you already have a MapBox account, log in. Upon login, the Account overview page displays.
Then, create an access token.
After the token is created, copy it to the clipboard.
महत्त्वपूर्ण
If you have created a secret token, Mapbox does not display secret tokens again after leaving the Access tokens page. Make a copy of this token now.
In Odoo, navigate to the app. In the Integrations section, locate the Map Routes setting. Paste the token in the Token field.
Be sure to click Save to save the settings.
व्हीकल कैपेसिटी
व्हीकल कैपेसिटी कॉन्फ़िगर करने के लिए, पर जाएं।
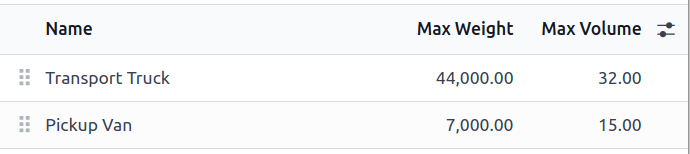
अगला, नई कैटगरी जोड़ने के लिए New पर क्लिक करें, या उसे मॉडिफाई करने के लिए मौजूदा कैटगरी में क्लिक करें। Name फ़ील्ड में, व्हीकल का टाइप एंटर करें (जैसे Pick-up truck, Van, या Cargo truck)। फिर, Max Weight (किलोग्राम में) और Max Volume (क्यूबिक मीटर में) फ़ील्ड में व्हीकल कैपेसिटी एंटर करें।
टिप्पणी
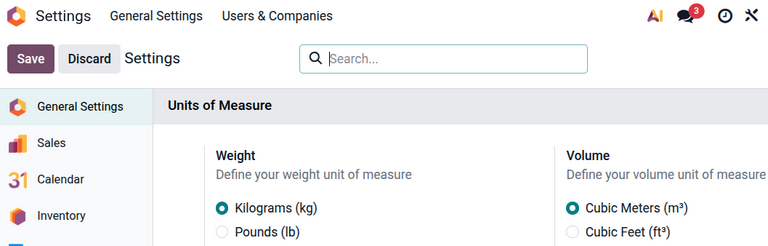
वाहन क्षमता के लिए माप की यूनिट ग्लोबल लेवल पर सेटिंग ऐप्लिकेशन में यूनिट ऑफ़ मेज़र सेक्शन में असाइन की जाती हैं।
यह भी देखें
कार मॉडल
Odoo में व्हीकल जोड़ते समय वाहन के कार मॉडल को कॉन्फ़िगर करना आवश्यक है। सुनिश्चित करें कि कार मॉडल के लिए सही कैटेगरी सेलेक्ट की गई है। ऐसा करने से उस टाइप के सभी व्हीकल में वज़न और वॉल्यूम क्षमताएं ऑटोमैटिकली लागू हो जाती हैं।
कॉन्फ़िगर करने के लिए, पर नेविगेट करें।
मॉडल लिस्ट से, मौजूदा मॉडल सेलेक्ट करें, या नया मॉडल बनाने के लिए टॉप-लेफ्ट कॉर्नर में नया पर क्लिक करें। फिर, संबंधित कैटेगरी फ़ील्ड को संबंधित व्हीकल कैटेगरी पर सेट करें।
यह भी देखें
डिलीवरी मेथड
Optionally, delivery vehicles can be assigned as a delivery method carrier.
डिलीवरी मेथड को कॉन्फ़िगर करने के लिए, पर जाएं। मौजूदा डिलीवरी मेथड सेलेक्ट करें, या नया पर क्लिक करें।
यह भी देखें
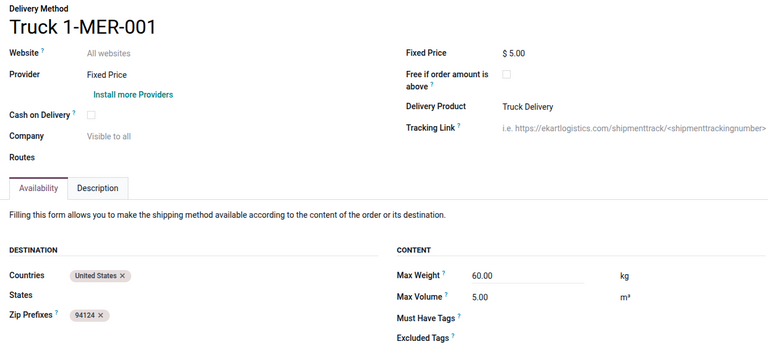
डिलीवरी मेथड फ़ॉर्म पर, डिलीवरी मेथड के लिए एक नाम दर्ज करें। पहचान की जानकारी का इस्तेमाल करने की सिफारिश की जाती है, जैसे व्हीकल डिस्क्रिप्शन और लाइसेंस प्लेट नंबर (जैसे ट्रक 123-ABCD)।
चूंकि डिलीवरी मेथड को इंटर्नली मैनेज किया जाता है, प्रोवाइडर को फ़िक्स्ड प्राइस या रूल्स के आधार पर पर सेट करें। शिपिंग प्राइस की कैलकुलेशन कैसे की जाती है, इसके बारे में ज़्यादा जानकारी के लिए, डिलीवरी मेथड आर्टिकल देखें।
इसके बाद, एक डिलीवरी प्रॉडक्ट सेट करें, जो वह प्रॉडक्ट है जो सेल्स ऑर्डर या इनवॉइस पर ग्राहक के डिलीवरी चार्ज के रूप में दिखाई देता है।
वैकल्पिक रूप से, Availability टैब में, लोकल डिलीवरी की रेंज को सीमित करने के लिए Countries, States, या Zip Prefixes सेट करें।
डॉक जगह
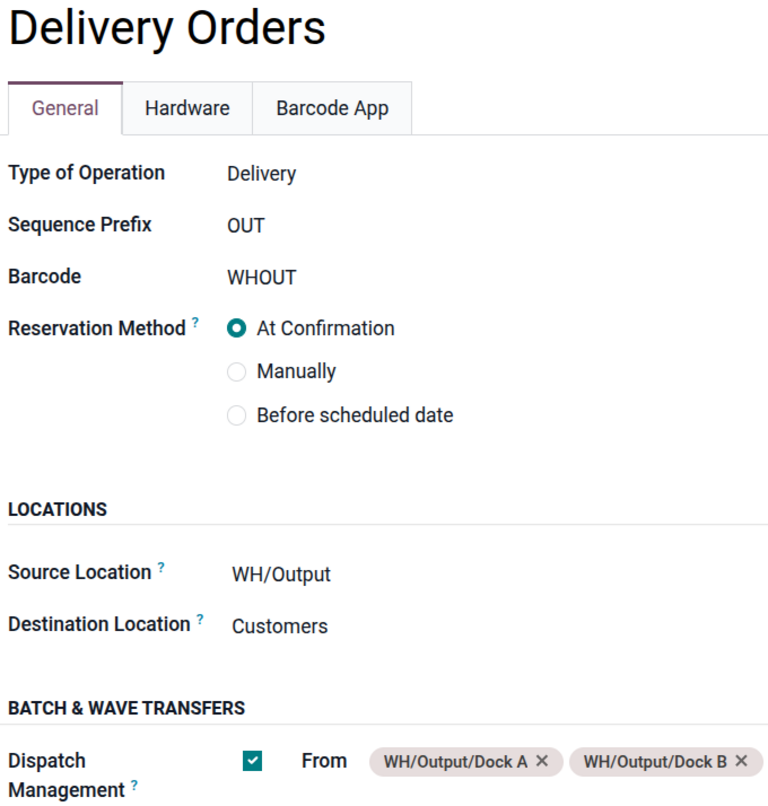
Each loading dock must have a dedicated location. To create dock locations, go to and click New.
After dock locations are set up in Odoo, configure them in the operation type. Navigate to and open an existing delivery operation type, or click New to create a new one.
After defining the other fields in the operation type form, scroll to the Batch & wave transfers section and select the Dispatch Management checkbox. The Dock locations field appears. Define the dock locations for this operation type.
यह भी देखें
लोड बनाएं
After setup is complete, optionally assign orders to a carrier and group them into batches. Then, configure the batch form, as needed.
प्रॉडक्ट को ग्रुप करने के लिए, पर जाएं, जो आउटगोइंग डिलीवरी की लिस्ट दिखाता है।
यह भी देखें
Because this article is about a specific use case, explore details about each picking method in their dedicated articles.
कैरियर असाइनमेंट
Reveal the Carrier column, if it is not visible by default, by clicking the (settings) icon in the top-right corner, and selecting the Carrier checkbox.
सलाह
सक्षम करने के लिए अन्य उपयोगी कॉलम Zip कोड, Shipping Weight, और Shipping Volume हो सकते हैं।
Select the delivery orders for the batch by selecting the checkboxes on the left. Next, click into the line's Carrier fields. In the resulting drop-down menu, choose the desired vehicle's delivery method. A Confirmation pop-up window appears, indicating the number of orders being added to the batch. Click Confirm, and the carrier is updated for all the selected records.
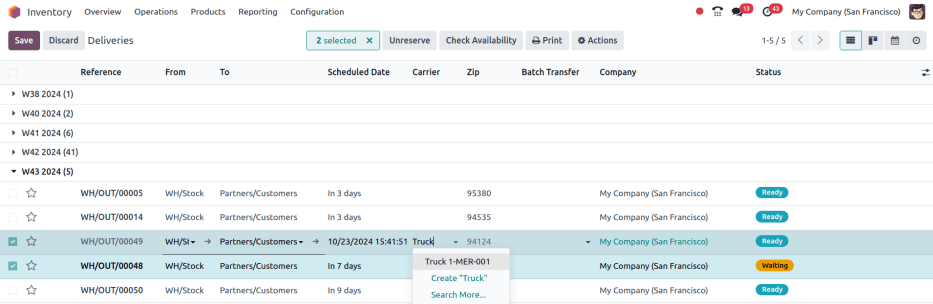
डिलीवरी विधि Truck 1-MER-001 दो डिलीवरी ऑर्डर के लिए कैरियर के रूप में सेट है।
बैच बनाएं
कैरियर सेट होने के साथ, चेकबॉक्स पर टिक करके ऑर्डर को बैच या वेव ट्रांसफ़र में जोड़ना शुरू करें।
टिप्पणी
अगर कोई डिलीवरी ऑर्डर पहले से ही बैच ट्रांसफ़र को असाइन है, तो यहां बैच ट्रांसफ़र असाइन करने से यह अपडेट नहीं होता है।
फिर, Actions बटन पर क्लिक करें, और Add to batch या Add to wave पर क्लिक करें। पॉप-अप विंडो में, सुनिश्चित करें कि Add to को a new [batch/wave] transfer पर सेट किया गया है, फिर Confirm पर क्लिक करें।
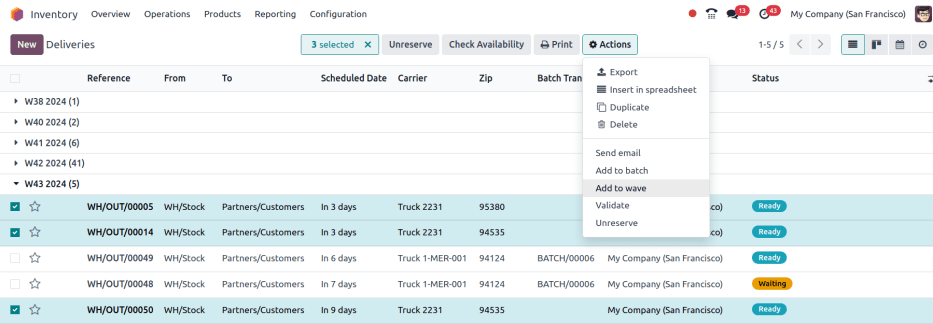
डिलीवरी ऑर्डर को वेव ट्रांसफ़र में ग्रुप करने के लिए चुना गया है।
वैकल्पिक बैच क्रिएशन विधि
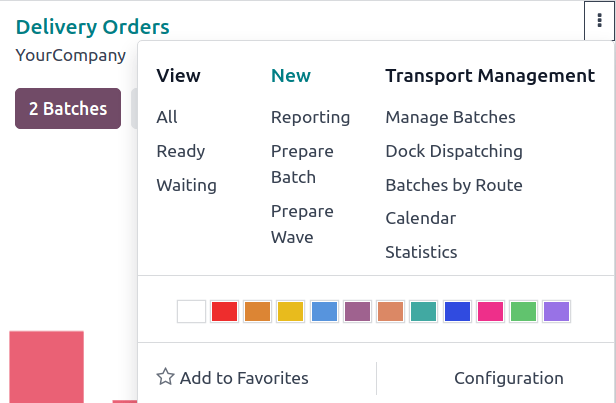
Another place to create batches is by going to the app, and in the Delivery Orders card, click the (vertical ellipsis) icon. In the resulting drop-down menu, click Prepare batch.
टिप्पणी
ट्रांसपोर्ट मैनेजमेंट ड्रॉप-डाउन मेन्यू में फ्लीट मैनेजमेंट के लिए अन्य टूल हैं:
Manage Batches: बैच की सूची खोलें
Dock Dispatching: शेड्यूल किए गए बैच ऑपरेशन के साप्ताहिक कैलेंडर व्यू को खोलें
Batches by Route: फ़ुलफ़िलमेंट रूट द्वारा ग्रुप किए गए बैच का कानबान व्यू
Calendar: शेड्यूल किए गए ऑपरेशन के प्रति घंटा कैलेंडर व्यू को खोलें
Statistics: बैच ट्रांसफ़र की पिवट टेबल खोलें
बैच फ़ॉर्म
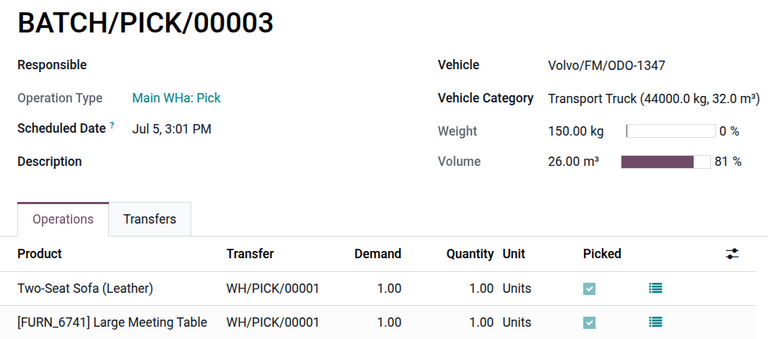
बैच ट्रांसफ़र फ़ॉर्म पर, निम्नलिखित फ़ील्ड को तदनुसार भरें:
Responsible: Assign an employee to the picking. Leave blank if any worker can fulfill this picking.
Operation Type: From the drop-down menu, select the operation type under which the picking is categorized.
Scheduled Date: Specify the date by which the Responsible person should complete the transfer to the output location.
Dock Location: Select the loading location.
Vehicle: Select the vehicle, which will auto-fill the Vehicle Category.
Vehicle Category: Determine if the order exceeds the vehicle's capacity limits
Example
The Volume bar indicates that the transport truck is nearing capacity.
डिलीवरी रूट तैयार करें
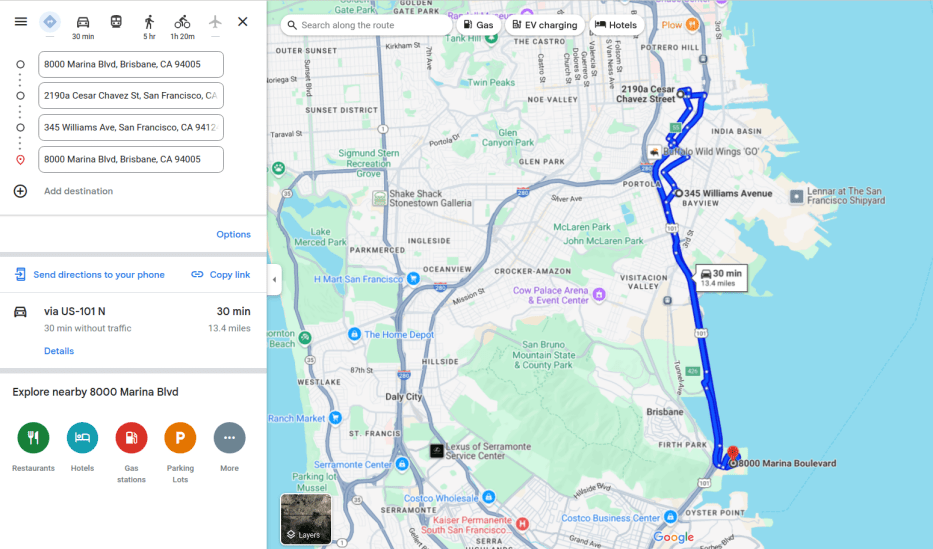
ड्राइवर को तैयार करने में मदद के लिए, मैप पर डिलीवरी डेस्टिनेशन देखने के लिए बैच या वेव फ़ॉर्म के ऊपर मैप बटन पर क्लिक करें। किसी व्यक्तिगत डिलीवरी ऑर्डर को चुनने पर उसकी जगह निर्धारित होती है।
टिप्पणी
मैप बटन सिर्फ़ प्रोग्रेस में स्टेटस वाले ट्रांसफर के लिए दिखाई देता है।
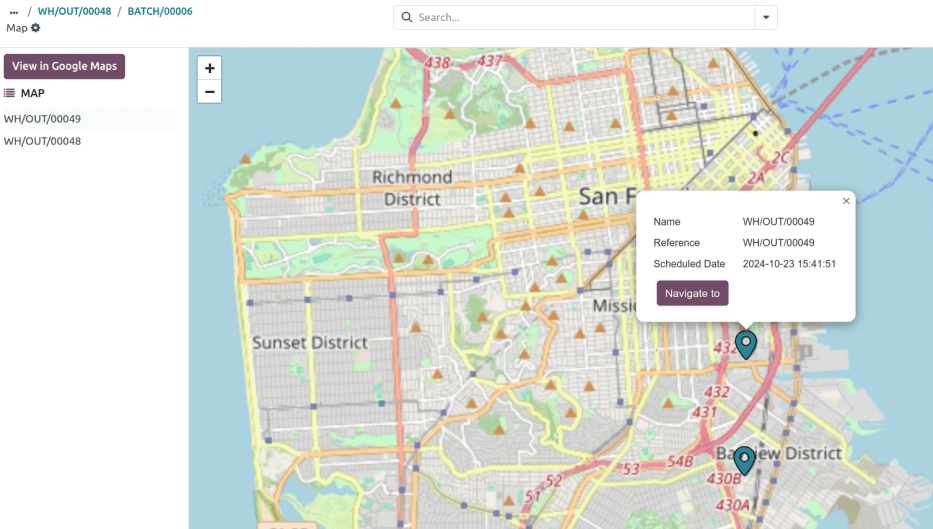
इसके अलावा, वेयरहाउस से डिलीवरी पॉइंट तक का रूट जनरेट करने के लिए Google मैप में देखें बटन का इस्तेमाल करें।