
लंच
Odoo में लंच ऐप्लिकेशन यूज़र को सुविधाजनक रूप से फ़ूड ऑर्डर करने और सीधे डेटाबेस से अपने मील के लिए पेमेंट करने की सुविधा देता है।
Before employees can use the Lunch application, there are a number of configurations that need to be made: settings, vendors, locations, products, and product categories. Once these are created and configured, employees can view offerings and order food.
कॉन्फ़िगरेशन
In the Settings menu, only two items need to be configured: overdraft settings and notifications. To access the settings, navigate to .
Configure the following:
लंच ओवरड्राफ़्ट: कर्मचारियों के लिए अधिकतम ओवरड्राफ़्ट राशि दर्ज करें। करेंसी फ़ॉर्मैट कंपनी की लोकलाइज़ेशन सेटिंग से निर्धारित होता है।
Reception notification: वह मैसेज सेट करें जो यूज़र को डिस्कस ऐप के ज़रिए तब मिलता है जब उनका फ़ूड डिलीवर हो गया हो। डिफ़ॉल्ट मैसेज
Your lunch has been delivered. Enjoy your meal!इस फ़ील्ड में भरा होता है, लेकिन इसे संशोधित किया जा सकता है, अगर चाहें तो।
अनुवाद सपोर्ट
If a database has multiple languages installed, many forms in the Lunch application have the option of entering translations for various fields.
If translations are available to be configured, a language code appears next to a translatable field on a form. To add translations for that field, click the two letter language code (for example, EN for English) and a translation pop-up window appears.
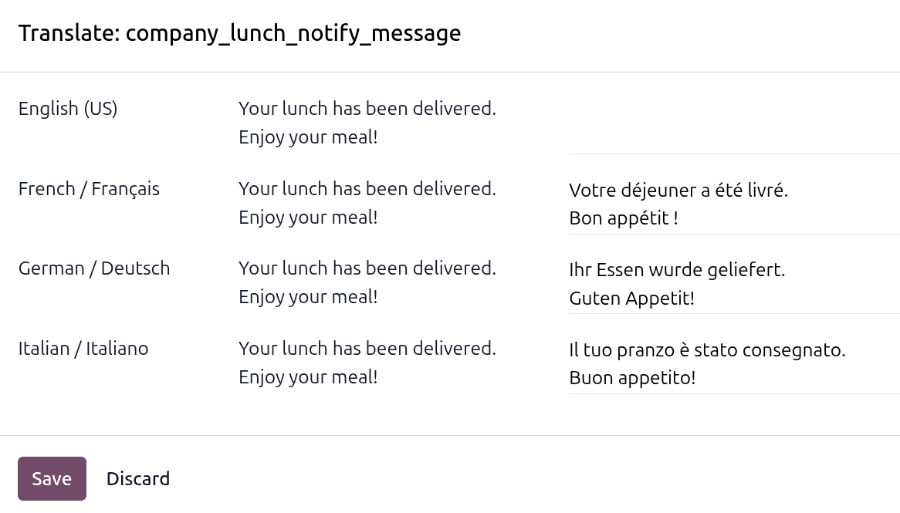
नीचे दी गई इमेज सेटिंग मेन्यू में Reception notification फ़ील्ड के लिए एक उदाहरण है।
पर जाएं। Reception notification सेक्शन के नीचे टेक्स्ट बॉक्स के ऊपर दाईं ओर EN पर क्लिक करें। एक Translate: company_lunch_notify_message पॉप-अप विंडो लोड होती है जिसमें डेटाबेस द्वारा इस्तेमाल की जाने वाली अन्य भाषाओं के लिए अनुवाद दर्ज करने का विकल्प होता है।
The first column lists the different languages in alphabetical order, with the currently selected language in bold. The second column has the currently configured message in each column. The last column in the far-right provides a text box to type in a translation for each language.
Enter the text that should appear for each language, then click Save.
लोकेशन
By default, Odoo creates an HQ Office location when the Lunch application is installed. If a
company has more than one location, they must be configured.
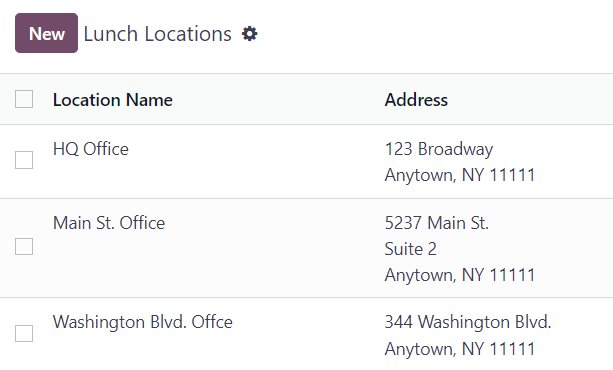
To add a location, navigate to . The currently configured locations appear in a list view. Click the New button in the top-left corner and a blank line appears beneath the last location in the list.
Enter the name of the location in the field. Next, click into the Address field to the right of the name, and enter the location's address. It is possible to enter multiple lines in the address field.
Repeat this for all locations that need to be added.
अलर्ट
It is possible to set up alerts that can either be displayed in the Lunch app, or be sent to specific employees via the Discuss app.
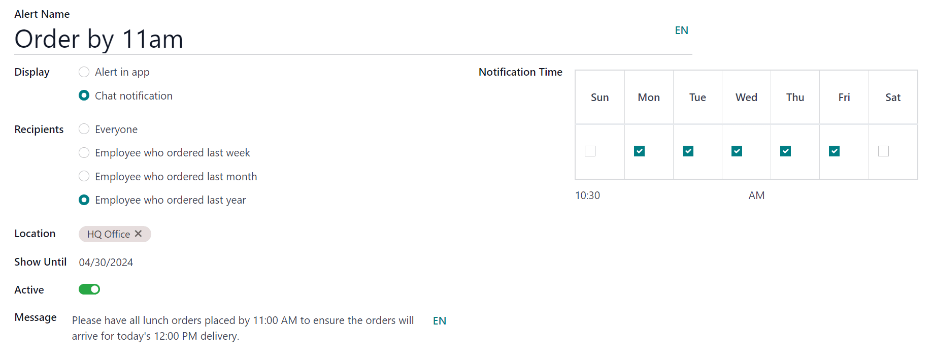
No alerts are preconfigured by default. To set up an alert, navigate to . Click the New button in the top-left corner and a blank lunch alert form loads. Enter the following information on the form:
अलर्ट नाम: अलर्ट के लिए एक नाम दर्ज करें। यह छोटा और वर्णनात्मक होना चाहिए, जैसे
New Lunch VendorयाOrder by 11:00 AM। यह फ़ील्ड आवश्यक है।डिस्प्ले: चुनें कि अलर्ट कैसे दिखाया जाए। विकल्प हैं:
ऐप्लिकेशन में अलर्ट: अलर्ट मुख्य लंच ऐप्लिकेशन डैशबोर्ड पर, एक नारंगी बॉक्स में, डैशबोर्ड के दाईं ओर यूज़र के नाम के ऊपर दिखाई देता है।
चैट नोटिफ़िकेशन: अलर्ट यूज़र को डिस्कस ऐप के ज़रिए चैट विंडो में भेजा जाता है। अगर यह विकल्प चुना जाता है, तो निम्नलिखित अतिरिक्त फ़ील्ड दिखाई देती है:
प्राप्तकर्ता: चुनें कि चैट अलर्ट किसे मिलता है। विकल्प हैं: सभी, पिछले सप्ताह ऑर्डर करने वाला कर्मचारी, पिछले महीने ऑर्डर करने वाला कर्मचारी, या पिछले साल ऑर्डर करने वाला कर्मचारी।
जगह: ड्रॉप-डाउन मेन्यू का इस्तेमाल करके उन जगहों को चुनें जहां अलर्ट दिखाई देता है। कई जगहें चुनी जा सकती हैं। यह फ़ील्ड आवश्यक है, इसलिए, अगर अलर्ट सभी जगहों पर लागू होता है, तो ड्रॉप-डाउन मेन्यू से सभी जगहें चुनें। अगर यह फ़ील्ड खाली छोड़ दी जाती है, तो अलर्ट नहीं दिखाया जाएगा।
तब तक दिखाएं: अगर अलर्ट किसी विशिष्ट तारीख को समाप्त होना चाहिए, तो कैलेंडर पिकर से तारीख चुनें।
सक्रिय: यह विकल्प डिफ़ॉल्ट रूप से सक्षम (हरा दिखाई देता) है। अलर्ट को बंद करने के लिए, टॉगल पर क्लिक करें ताकि यह अब हरा दिखाई न दे।
Message: Enter the alert message in this field. This field is required.
नोटिफ़िकेशन समय: सप्ताह के वे दिन चुनें जब अलर्ट दिखाई देता है या भेजा जाता है। डिफ़ॉल्ट रूप से, सभी सात दिन सक्रिय होते हैं। सेटिंग को सक्रिय से निष्क्रिय में बदलने के लिए चेकबॉक्स पर क्लिक करें।
टिप्पणी
अगर डिस्प्ले विकल्प के लिए चैट नोटिफ़िकेशन चुना गया था, तो नोटिफ़िकेशन समय ब्लॉक के नीचे एक समय फ़ील्ड दिखाई देती है। वह समय दर्ज करें जब चैट मैसेज भेजा जाता है। फिर, टाइम फ़ील्ड के दाईं ओर ड्रॉप-डाउन मेन्यू का इस्तेमाल करके चुनें कि समय AM है या PM।
यह भी देखें