一括処理
一括処理は、複数の給与明細を一度に生成し、個別の給与明細を作成・処理するのではなく、グループとして処理するために使用されます。この方法は、給与部門が短時間で従業員に支払いを行うだけでなく、給与明細を整理するのにも役立ちます。
通常、企業の給与部門は、給与支給期間(通常は週次、隔週、または月次)ごとに、各給与体系に対して新しい一括処理を作成します。必要に応じて、一括処理を部門、職位、または給与体系タイプ別にさらに整理することもできます。
一括処理が作成されると、給与明細が一括処理に追加され、その後一括処理が処理され、従業員に支払いが行われます。
一括処理を表示
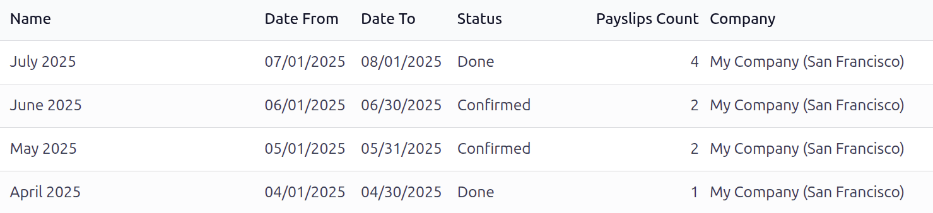
データベース内のすべての一括処理を表示するには、に移動すると、作成されたすべての給与明細一括処理が表示されます。これらの給与明細一括処理は、デフォルトでリストビューで表示されます。
各一括処理には、名前、一括処理に含まれる日付(開始日および終了日フィールド)、ステータス、一括処理内の給与明細数(給与明細数)、および会社が表示されます。
新しい一括処理を作成
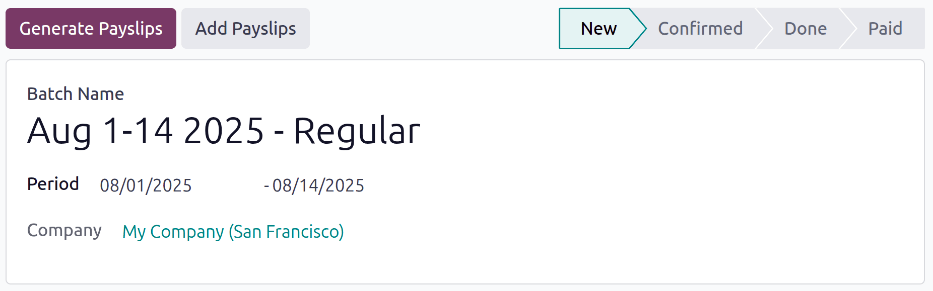
新しい給与明細の一括処理は、に移動して一括処理ダッシュボードから作成する必要があります。左上隅の新規ボタンをクリックします。これにより、別のページに空白の給与明細一括処理フォームが表示されます。
新しい給与明細一括処理フォームで、Batch Nameを入力します。記録を整理するために、短く説明的なものにする必要があります。
Example
ある会社は従業員に隔週で給与を支払い、使用している2つの異なる給与体系に対して別々の一括処理を作成します:労働者給与と通常給与。
2025年8月の4つの一括処理の名前は次のとおりです:
Aug 1-14 2025 - WorkerAug 1-14 2025 - RegularAug 15-31 2025 - WorkerAug 15-31 2025 - Regular
次に、一括処理が適用される日付範囲を選択します。期間フィールドのいずれかをクリックすると、カレンダーポップアップウィンドウが表示されます。このカレンダーポップアップウィンドウから、正しい月に移動し、一括処理の開始日と終了日の両方について対応する日をクリックします。
現在の会社が会社フィールドに入力されます。マルチカンパニー環境で操作している場合、フォームから会社を変更することは**できません**。一括処理は、目的の会社のデータベース内で**作成する必要があります**。
一括処理に給与明細を追加する
一括処理が作成されたら、一括処理に給与明細を追加する必要があります。給与明細は一括処理に作成して追加するか、*既に*作成されている場合は一括処理に追加できます。
重要
一括処理には、新規ステージにあるときにのみ給与明細を追加できます。給与明細はデータベースによって作成されて一括処理に追加するか、既存の給与明細を個別に追加できます。
これらのいずれかの方法が使用されると、一括処理のステータスは確認済みに変わり、給与明細を追加する両方のオプションが表示されなくなります。
給与明細を生成
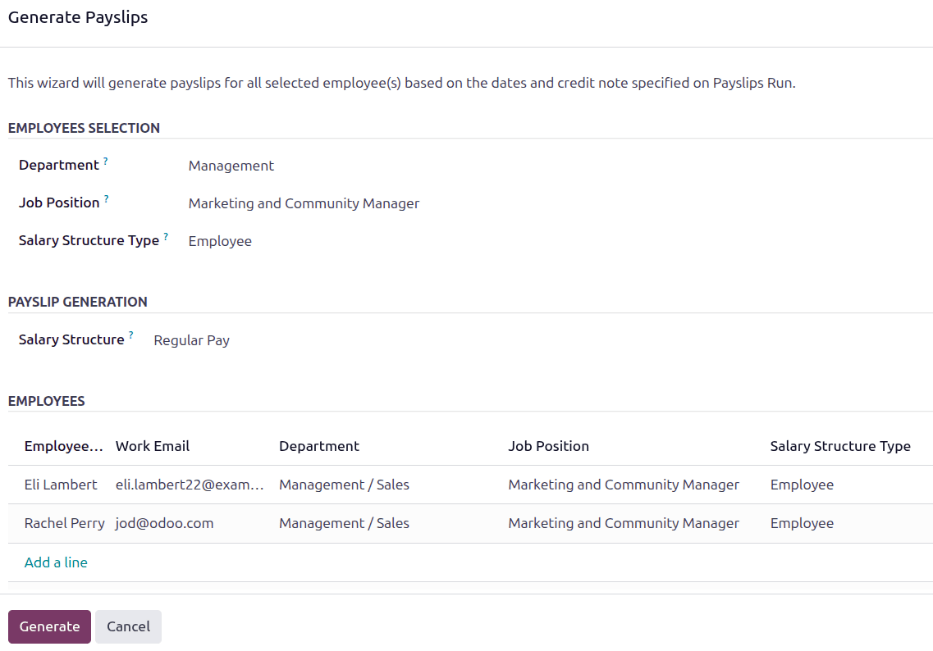
給与明細を生成して一括処理に追加するには、まずに移動して一括処理を開き、目的の一括処理をクリックします。次に、Generate Payslipsボタンをクリックすると、Generate Payslipsポップアップウィンドウが読み込まれます。
このフォームには3つのセクションがあり、このフォームの設定によって作成される給与明細が決まります。Employees Selectionセクションでは、どの従業員の給与明細を作成するかを決定します。ドロップダウンメニューを使用して、必要に応じて部門、Job Position、Salary Structure Typeフィールドを設定します。選択を行うと、下部の従業員セクションが更新され、生成される給与明細が表示されます。
Payslip Generationセクションでは、ユーザは給与明細を作成する特定のSalary Structureを選択できます。空白のままにすると、各従業員のデフォルトの構造を使用して給与が計算されます。
注釈
デフォルトでは、Odoo は給与明細を生成する際に従業員セクションにすべての従業員をリストします。
選択を行うと、リストは自動的にフィルタリングされます。
特定の従業員を**除外**して一括処理を作成する場合を除き、設定はオプションです。
すべての必要な設定が完了したら、Generateボタンをクリックすると、すべての給与明細が作成され、一括処理に添付されます。生成されると、上部に一括処理内の給与明細の数とともにPayslipsスマートボタンが表示されます。このスマートボタンをクリックすると、一括処理内のすべての給与明細のリストが表示されます。
Once the payslips have been generated and attached to the batch, the status of the batch changes to Confirmed.
給与明細を追加
Instead of generating payslips, individual payslips that have already been created can be added to a batch. Start by opening the desired batch by navigating to , and clicking on the desired batch.
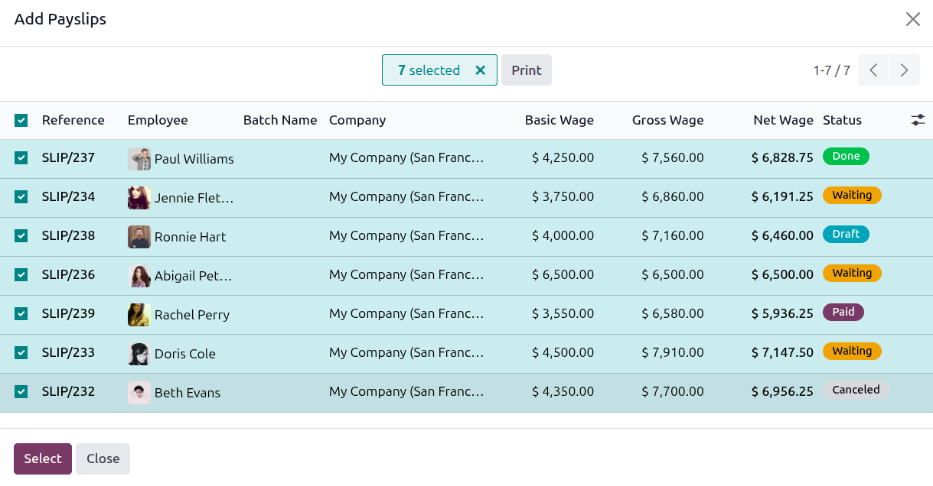
Next, click the Add Payslips button, and an Add Payslips form loads in a pop-up window. All available payslips that have not yet been added to a batch, appear on the list.
注釈
All payslips not yet assigned to a batch appear in the list, regardless of status (Draft, Waiting, Paid, or Cancelled). This allows already processed or cancelled payslips to be grouped retroactively for reporting or record keeping purposes.
Tick the checkbox next to each desired payslip to be added, then click the Select button at the bottom. All selected payslips are added to the batch, and the status of the batch changes to Confirmed. A Payslips smart button appears at the top, along with the number of payslips in the batch. Click this smart button to view a list of all the payslips in the batch.
一括処理を処理
After a batch has been created , and all required payslips have been added, the batch must then be processed, and employees paid.
Open the desired batch by navigating to , and clicking on the desired batch. For a batch to be processed, it must have a status of Confirmed. That means the batch has been created and payslips have been added to them, but the payslips have not been processed yet.
Click the Create Draft Entry button to confirm and create a draft of the individual payslips. After this occurs, the batch status changes to Done.
注釈
At any time, the batch needs to be reverted back to a status of New, click the Set to Draft button. This action does not remove any payslips that have already been added to the batch, instead, the status changes back to New.
After any desired changes have been made, click Confirm and the batch status changes to Confirmed.
It is important to note, that if any payslips in the batch have a status of Paid, the batch cannot revert to a status of New.
Once the status has changed to Done, the payments must be logged in the database. Click the Create Payment Report button, and a pop-up window loads, where the payment report details are entered.
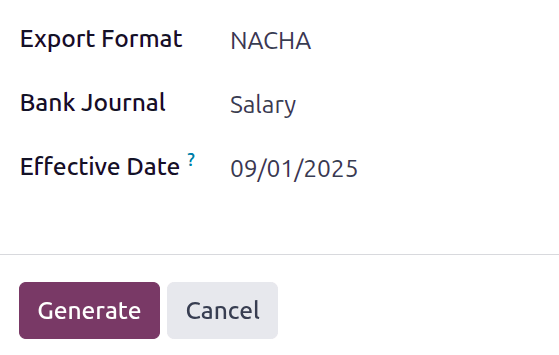
Using the drop-down menu, select the Export Format for the payment report. The two default options available are NACHA, and CSV.
The NACHA option creates a compatible ACH file which is sent to the company's bank, and outlines all the banking information to transfer money from the company to the employees, either via direct deposit (most common) or a check. Refer to the fiscal localization document for more information.
注釈
データベースにインストールされている給与ローカライゼーションに応じて、他のオプションが利用できる場合があります。
If CSV is selected, all other fields are hidden form view. Once this is selected, click the Generate button to create the payment report.
Next, select the desired Bank Journal the paychecks are logged on. Last, using the calendar selector, set the date the paychecks are issued in the Effective Date field.
Once the pop-up window is configured, click the Generate button, and the file appears on the batch form, in a new Payment Report field.
レポートが作成されたら、済とするボタンをクリックして、データベース内の給与明細を支払済みとしてマークします。