再供給下請
In resupply subcontracting, a company supplies the components of its product to a subcontractor, who manufactures the product, then delivers the finished product to the company's warehouse.
This document covers how to configure a subcontracted product and walk through the resupply subcontracting process.
注釈
このドキュメントでは、下請け商品を必要とする内部企業を指す場合は*企業*という用語を使用し、下請け商品の外注生産を処理する外部ベンダーを指す場合は*下請け業者*という用語を使用します。
設定
In order to use the resupply subcontractor workflow, users must follow the configuration process below:
Specify the subcontractor as a vendor on the subcontracted product.
Create a subcontracting-type BoM for the product and add the necessary components.
Specifying the subcontractor as a vendor on the product form allows the contracting company to properly purchase the product from the subcontractor through a purchase order (PO). The bill of materials (BoM) allows the product to be manufactured externally by the subcontractor. By default, components specified on a subcontracting-type BoM are automatically configured to be sent from the contractor to the subcontractor.
Specify product vendor
再供給下請のために製品のベンダーを設定するには、に移動し、プロダクトを選択するか、新しいプロダクトを作成します。
プロダクトフォームで*購買*タブをクリックし、明細追加をクリックしてプロダクトの下請け業者をベンダーとして追加します。ベンダードロップダウンメニューを使用して下請け業者を選択します。
次に、単価フィールドにプロダクトの価格を入力します。
Finally, set a Lead Time for the product in the corresponding field to specify the number of days for the subcontractor to receive components, produce the product, and deliver the finished good.
注釈
Since contractors are not responsible for manufacturing the final product, there is no need to configure manufacturing lead times on a BoM. Instead, provide only a single Lead Time on the vendor pricelist, factoring in the duration for the subcontractor to receive the components from the contractor, manufacture the product, and deliver the finished goods back to the company.
Configure BoM
ベンダーを指定したら、製品の下請タイプの|BoM|を設定します。まず、製品ページの:guilabel:部品表スマートボタンをクリックします。次に、目的の|BoM|を選択するか、新しいものを作成します。
ちなみに
または、 に移動し、外注プロダクトの部品表を選択します。
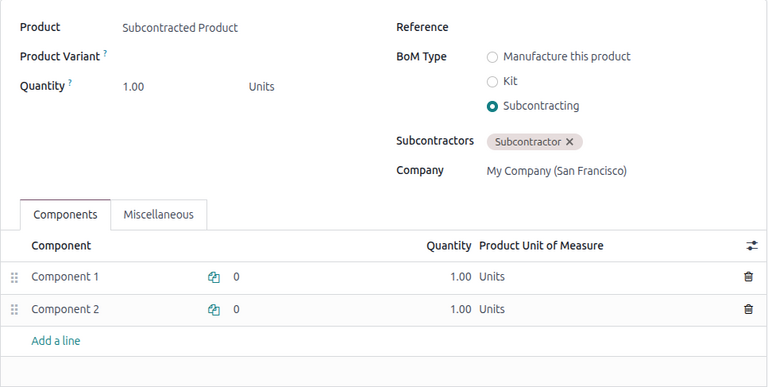
In the BoM Type field, select the Subcontracting option. Then, add one or more subcontractors in the Subcontractors field below.
Finally, add all necessary components in the Components tab. To add a new component, click Add a line. Then, select the Component using the drop-down menu , and specify the required Quantity in the corresponding field.
ワークフロー
The resupply subcontracting workflow can be summarized in the following steps:
Validate the resupply order to send the components.
Validate the receipt to receive the final product.
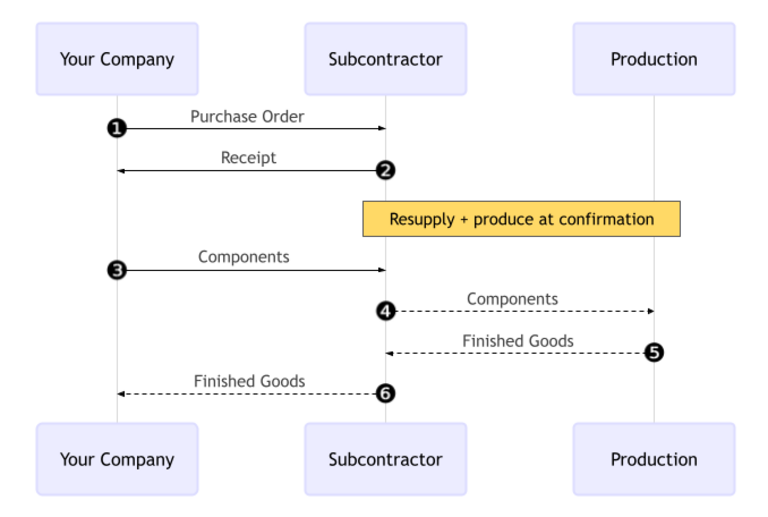
The workflow begins by creating a PO to purchase the product from the subcontractor (1).
その後、会社はPOを確定し、構成品を譲渡するための補給オーダと、外注先から完成品(2)を受領するためのレシートの両方が作成されます。
Next, the contractor validates the transfer of components to the subcontractor (3). The subcontractor begins producing the product.
Once the product has been produced and received, the contractor validates the receipt (6) to trigger inventory moves from the subcontractor to the company's stock (4, 5).
Create and confirm subcontractor PO
下請製品のPOを作成するには、に移動し、新規をクリックします。
購買オーダの入力は、:guilabel:`仕入先`ドロップダウンメニューから外注先を選択するところから始めます。
*プロダクト*タブでプロダクトを追加をクリックし、外注プロダクトを選択します。次に、対応するフィールドに数量を入力します。
プロダクトを追加すると、予想到着日フィールドが、仕入先の*リードタイム*で先に設定した完成品の予想配送日で更新されます。
最後にオーダを確定をクリックしてPOを確定します。レシートと補給オーダが自動的に作成され、フォーム上部のレシートおよび補給スマートボタンからアクセスできます。
再供給オーダを最終確定
PO上部の補給スマートボタンをクリックして補給オーダを開き、確認をクリックして構成品が外注先に送られたことを確認します。
または、**在庫**アプリを開き、外注先への補給カードで(#)処理待ちボタンをクリックします。該当する補給オーダを選択し、確認をクリックして構成品が外注先に送られたことを確認します。
入荷処理
補給オーダが確定されると、外注先はプロダクトを製造し、完成品を会社に納品します。
外注先から完成品を受領するには、POのプロダクトを受領ボタンをクリックするか、ページ上部のレシートスマートボタンをクリックします。次に確認をクリックして入荷出荷を在庫に入力します。
注釈
複数ステップの在庫フローが有効になっている場合、入荷プロダクトを在庫に入力するために追加の転送を確認する必要があります。
在庫移動を追跡
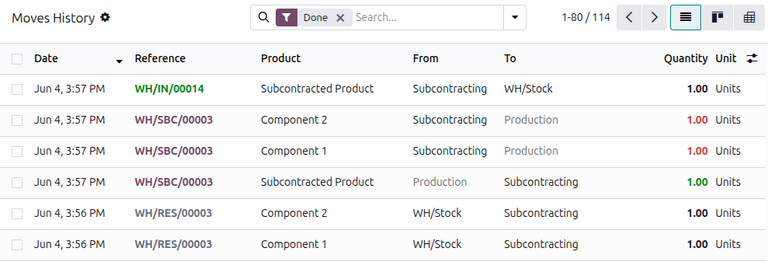
レシートを最終確定すると、Odooは外注プロダクトのロケーション間の移動を追跡するための在庫移動を自動的に生成します。これらの在庫移動を表示するには、に移動します。
補給外注では、Odooはまず、すべてのプロダクト構成品を*外注*と呼ばれる専用ロケーションに譲渡します。次に*製造*と呼ばれる別のロケーションが構成品を消費し、完成品を製造します。製造されると、完成品は*外注*ロケーションに戻り、最終的にレシートが最終確定されたときに会社の在庫に入ります。