外注先に直送する
*下請け業者へのドロップシップ*ワークフローでは、企業がベンダーからプロダクトの構成品を購入し、ベンダーがそれらを製造のために下請け業者に直接配送します。下請け業者は完成品を企業に送り返します。
以下のドキュメントでは、下請けプロダクトの設定方法と*下請け業者へのドロップシップ*ワークフローの手順について説明します。
注釈
このドキュメントでは、下請け商品を必要とする内部企業を指す場合は*企業*という用語を使用し、下請け商品の外注生産を処理する外部ベンダーを指す場合は*下請け業者*という用語を使用します。
設定
In order to use the Dropship to Subcontractor workflow, users must first follow the configuration process below:
Specify the subcontractor as a vendor on the subcontracted product.
Create a subcontracting-type bill of materials (BoM) for the product and add the necessary components.
For each dropshipped component, open its product form, then set its dropship vendor and the Dropship route.
Specifying the subcontractor as a vendor on the product form allows the contracting company to properly purchase the product from the subcontractor through a purchase order (PO). The BoM allows the product to be manufactured externally by the subcontractor. The Dropship route is applied to each component in order to be properly sent from the dropshipping vendor to the subcontractor.
重要
In order to configure product components for dropshipping, make sure that the Dropshipping feature is enabled in the Odoo settings.
To do so, navigate to either the Inventory or Purchase app, then click . Finally, in the Logistics section, enable the Dropshipping setting.
Specify product vendor
To configure a product's vendor for dropship subcontracting, navigate to , and select a product, or create a new one.
プロダクトフォームで、購買タブをクリックし、明細追加をクリックして製品の下請業者を仕入先として追加します。仕入先ドロップダウンメニューで下請業者を選択します。
次に、単価フィールドにプロダクトの価格を入力します。
Finally, set a Lead Time for the product in the corresponding field to specify the number of days for the subcontractor to receive components, produce the product, and deliver the finished good.
注釈
Companies do not need to configure manufacturing lead times on a BoM. Instead, provide only a single Lead Time on the vendor pricelist, factoring in the duration for the subcontractor to receive the components from the dropship vendor, manufacture the product, and deliver the finished good back to the company.
Configure BoM
ベンダーを指定した後、プロダクトに下請けタイプのBoMを設定します。まず、プロダクトページの部品表スマートボタンをクリックします。次に、目的のBoMを選択するか、新規作成します。
ちなみに
または、 に移動し、外注プロダクトの部品表を選択します。
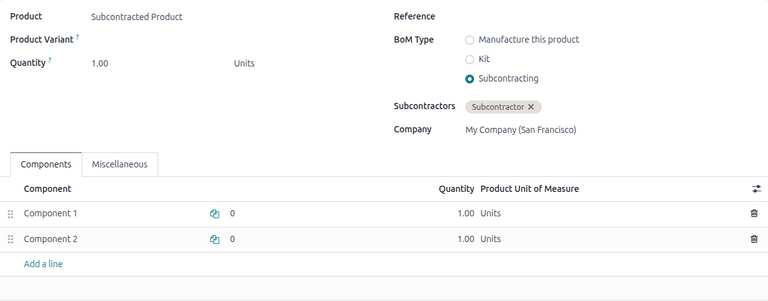
BOM タイプフィールドで、下請けオプションを選択します。次に、下請け業者フィールドに1つ以上の下請け業者を追加します。
最後に、必要な全ての構成品が 構成品 タブで指定されていることを確認してください。新しい構成品を追加するには、明細追加 をクリックし、構成品 ドロップダウンメニューで構成品を選択し、数量 フィールドに必要な数量を指定します。
構成品を設定する
When dropshipping to subcontractors, each component of a product must have a specified vendor and have the Dropship route enabled. This allows the components to be properly dropshipped from the vendor to the subcontractor.
構成品のベンダーを指定するには、構成品タブで構成品の名前を選択し、(内部リンク)矢印をクリックします。
ちなみに
または、に移動して、構成品を選択します。
構成品のプロダクトフォームで、購買タブをクリックします。行を追加をクリックしてベンダーを追加します。次に、ベンダーフィールドでベンダーを選択します。
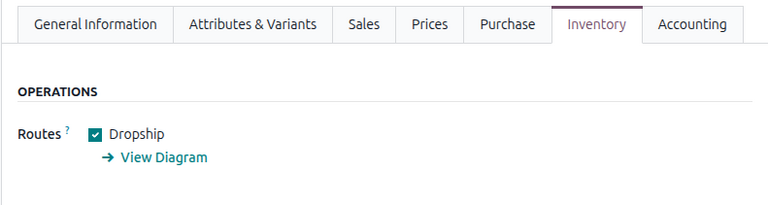
Next, to configure the route, click on the Inventory tab and select the Dropship route in the Routes section.
下請け業者に直送されるすべての構成品について、この手順を繰り返します。
ワークフロー
The Dropship to Subcontractor workflow can be summarized in the following steps:
Open and confirm the dropship vendor request for quotation (RfQ).
Validate the dropship order to send the components.
Validate the receipt to receive the final product.
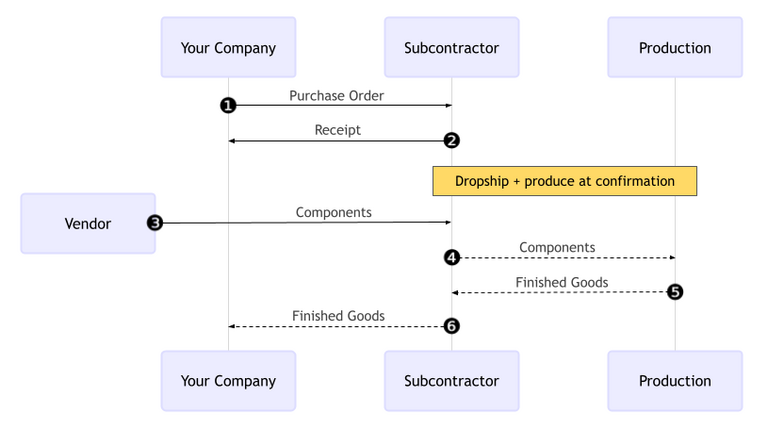
The workflow begins by creating a PO to purchase the product from the subcontractor (1).
次に、請負業者(貴社)が下請け業者POを確定します(2)。これにより、ベンダーから構成品を購入するためのRfQと、最終プロダクトを転送するための受領書が作成されます。
Next, the contractor confirms the RfQ, turning it into a vendor PO and creating a dropship order to send the components from the vendor to the subcontractor (3). Once the contractor validates the dropship order, the subcontractor begins to manufacture the final product with the components and ships it to the contractor when done.
Once the product has been produced and received, the contractor validates the receipt (6) to trigger inventory moves from the subcontractor to the company's stock (4, 5).
Create and confirm subcontractor PO
下請製品のPOを作成するには、に移動し、新規をクリックします。
POへの入力を開始するには、仕入先ドロップダウンメニューから下請業者を選択します。プロダクトタブで、プロダクトを追加をクリックして新しいプロダクト行を作成します。プロダクトフィールドで下請製品を選択し、数量フィールドに数量を入力します。
プロダクトを追加した後、予定到着日フィールドは、ベンダーの*納期*で以前に設定した完成品の予定配送日で更新されます。
最後に、注文を確定をクリックしてPOを確定します。受領書が自動的に作成され、フォーム上部に受領スマートボタンが表示されます。さらに、直送ベンダーから構成品を購入するための個別のRfQが自動的に作成されます。
注釈
This RfQ is not automatically linked to the PO. It must be accessed separately on the Requests for Quotation page.
仕入先見積依頼を確認する
ベンダーのRfQを確定するには、に移動します。適切なベンダーに対して新しく作成されたRfQを選択します。
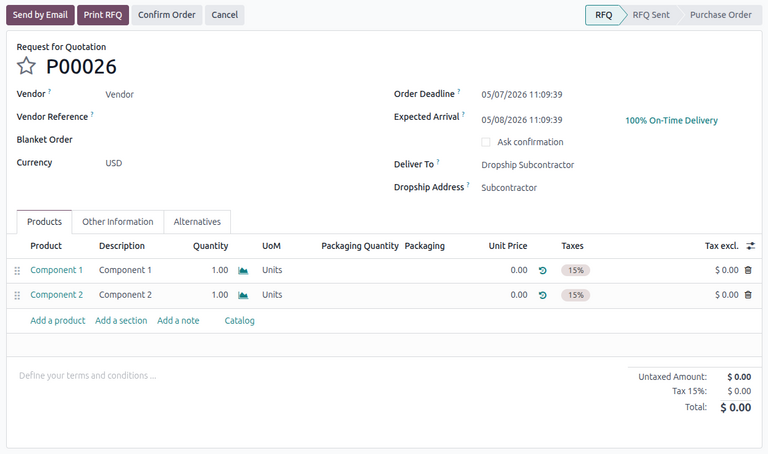
見積依頼の 配送先 フィールドには 外注先直送 ` と表示され、:guilabel:`直送先 フィールドには、構成品が直送される外注先の名前が表示されます。
注文の確定をクリックして、ベンダーから構成品の購入を確定します。これにより|RfQ|がベンダーの|PO|に変わります。ベンダーの|PO|の上部に:icon:fa-truckドロップシップスマートボタンが表示されます。
注釈
同時に、先ほど作成した下請業者の|PO|の上部に:icon:fa-truck再供給スマートボタンが表示されます。ドロップシップ下請では、このスマートボタンがドロップシップオーダに接続されます。
ドロップシップオーダを最終確定
ドロップシップベンダーによって構成品が下請業者に配達されたら、ベンダーの|PO|の:icon:fa-truckドロップシップスマートボタンをクリックしてドロップシップオーダを開きます。
注釈
ドロップシップオーダは下請業者の|PO|からも開くことができます。に移動し、POを選択してから、再供給スマートボタンをクリックします。
最後に、上部の:guilabel:確認ボタンをクリックして、下請業者が構成品を受け取ったことを確定します。その後、下請業者は最終製品の製造を開始します。
入荷処理
After the subcontractor completes production, the finished product is shipped to the company.
製品を在庫に入庫するには、に移動し、下請業者の|PO|を選択します。
POの上部で、製品の受領ボタンをクリックするか、受領スマートボタンをクリックします。次に、確認をクリックして入荷を在庫に入力します。
注釈
複数ステップの在庫フローが有効になっている場合、入荷プロダクトを在庫に入力するために追加の転送を確認する必要があります。
在庫移動を追跡
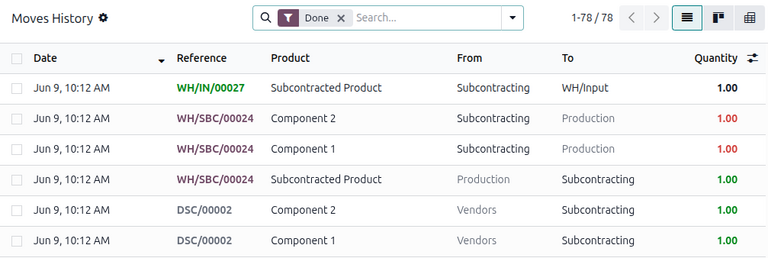
入荷を最終確定すると、Odoo は自動的に在庫移動を生成し、ロケーション間での下請けプロダクトの移動を追跡します。これらの在庫移動を表示するには、に移動します。
In the Dropship to Subcontractor workflow, product components are first sent from the vendors to a dedicated location called Subcontracting. Another location called Production then consumes the components and produces the finished good. Once produced, the good then moves back to the Subcontracting location before finally entering the contractor's stock when the receipt is validated.