
创建活动
使用活动应用程序,组织者可以在 Odoo 中创建和配置线下或在线活动。每个新活动都包含许多选项,用于自定义特定的后勤安排,例如门票销售、登记处、展位、议程、赞助商、会议室等。
活动可以从头手动创建,也可以从预配置的模板构建。启动后,活动应用程序可与其他应用程序集成以增强功能,包括推广活动、向参会者销售注册门票以及使用可自定义规则生成潜在客户。
仪表板
要创建活动,请导航至活动应用程序以进入仪表板。默认情况下,活动仪表板使用 (看板)视图,该视图在各自的管道阶段中显示数据库中的所有活动。可以使用右上角的按钮设置其他视图。
每张活动卡片显示活动名称、计划日期、地点、预期参会者人数、与活动相关的任何计划活动以及负责的活动经理。
The default stages in the Kanban view are New, Booked, Announced, and Ended. The cards can be dragged and dropped into any stage in the pipeline.
注解
The Ended stage is folded by default and located to the right of the other stages.
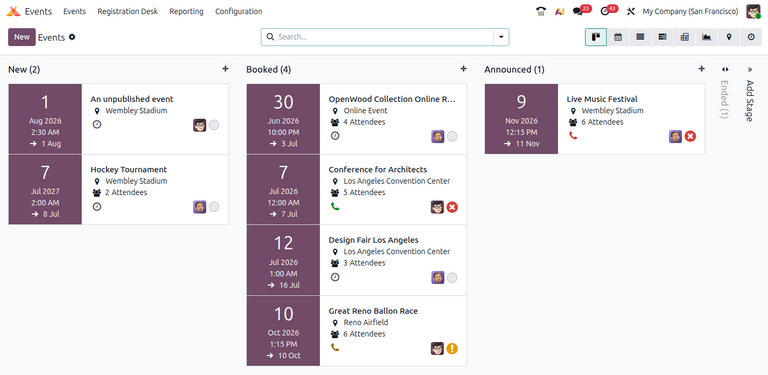
To add a new stage, click the Add Stage button on the right, enter a name for the stage, then click (Add) to add the stage or (Remove) to cancel.
添加新活动
可以通过访问应用程序,在 (看板)、 (列表)或 (甘特图)视图中创建活动。然后,单击仪表板左上角的新建按钮以打开新的活动表单。
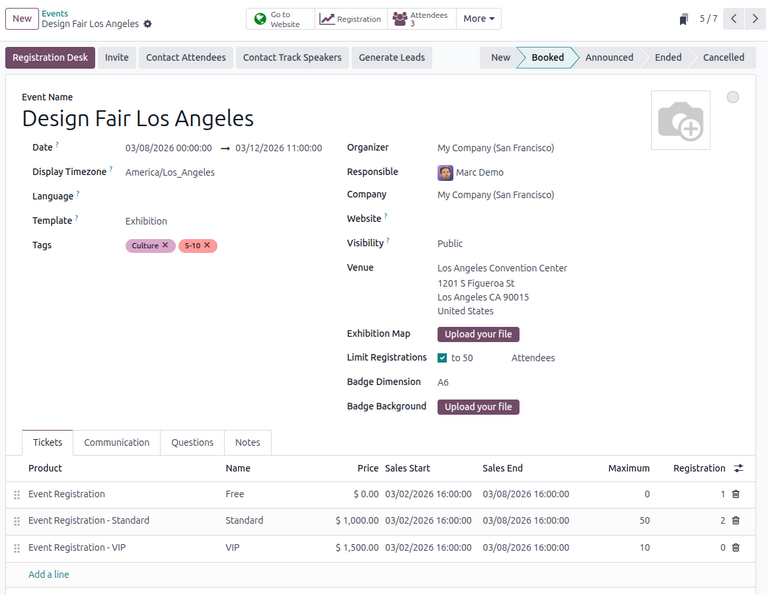
At the top of the event form are a series of smart buttons related to various event metrics. These auto-populate with data once attendees begin to register, when booths and sponsors sign on for the event, when the event takes place, and so on. These smart buttons can be clicked to navigate to the event’s related pages to modify any details and perform any desired actions.
智能按钮下方是活动表单,其中包含用于配置活动必要详细信息的各种字段和可点击的标签。
首先,在以下字段中输入有关活动的一些基本信息:
活动名称:活动的标题。此字段为必填。
日期:活动的计划日期或日期范围(以本地时区表示)。此字段会自动填充但可修改,且为必填。
显示时区:活动日期在网站上显示的时区。此字段自动填充但可修改,且为必填项。
语言:所有活动通信所选的语言。
注解
在输入的活动名称右侧有一个语言提示,以缩写的语言指示器(例如EN)表示。点击后会出现翻译名称弹出窗口,显示数据库中可用的各种预配置语言翻译选项。
或者,要从活动模板填充活动表单,请在模板下拉菜单中选择一个选项。要了解更多信息,请参阅活动模板文档。
此外,在标签字段中为活动添加任何相应的标签(例如在线、会议)。每个活动可以添加多个标签。
小技巧
通过在中启用在网站上显示复选框,可以在网站上列出的活动中显示标签。
继续在以下字段中输入联系人和场地位置等信息:
主办方:活动的主办方(公司、联系人或员工)。
负责人:在数据库中负责管理活动的特定用户。
公司:数据库中与活动相关的特定公司。此字段仅在多公司环境中显示。此字段自动填充但可修改,且为必填项。
网站:在数据库中发布活动的特定网站。如果此字段留空,则该活动可以发布在数据库中的所有网站上。要了解更多信息,请参阅多个网站文档。
场地:活动场地位置。此字段从联系人应用程序提取信息。或者,可以手动输入信息。
要限制活动的报名人数,请勾选限制报名并在结果字段中输入允许的最大参加者人数。
其他活动配置
填写活动表单上的字段后,继续使用底部的四个标签页进行进一步自定义。
门票选项卡
在活动表单的门票标签页中,为活动创建自定义报名门票和门票等级。
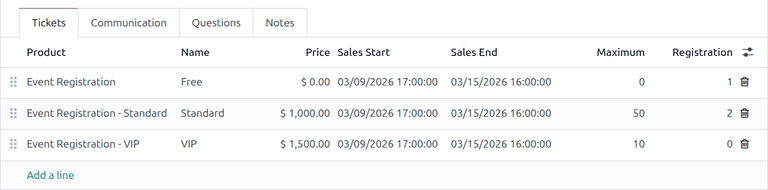
要创建门票,请在门票标签页中点击添加一行。在产品字段中,选择预配置的活动报名产品,或者通过输入新活动报名产品的名称来创建一个新产品,然后从结果下拉菜单中选择创建或创建并编辑…。然后,在名称字段中输入门票的名称(例如基本门票或VIP)。
重要
为了使活动报名产品可以在门票选项卡中被选择,活动报名产品类型**必须**设置为服务,并且订单时创建字段**必须**设置为活动报名。
小技巧
现有的活动报名产品也可以直接从该字段进行修改,点击活动报名产品旁边的(右箭头)图标即可。这样做会显示该产品的表单。如果安装了**库存**应用,则可以使用其他选项来自定义产品。
然后,在 价格 字段中设置门票注册费用。
注解
活动报名产品表单上定义的销售价格设置了门票的默认成本。在门票选项卡中修改门票的价格会为该活动的门票设置新的报名成本。
接下来,在相应字段中输入销售开始和销售结束日期。点击空白字段即可显示日历弹出窗口。从那里选择所需的日期和时间,然后点击应用。
然后,如果需要,指定可出售的 最大 票量。
报名列显示已售出的门票数量。
要从门票选项卡中删除任何门票,请点击应删除门票对应行右侧的(垃圾桶)图标。
小技巧
要在 门票 标签中添加可选的 说明 列,请点击列标题最右侧的 (附加选项) 下拉菜单。
Then, select the checkbox beside Description from the resulting drop-down menu.
添加后,就会出现为每张活动门票添加简要说明的选项,可用于告知参与者购买特定门票时可能附带的任何优惠或设施。
沟通选项卡
在活动表单的沟通选项卡中,创建各种营销沟通,可以安排在活动前后的特定时间间隔发送。
注解
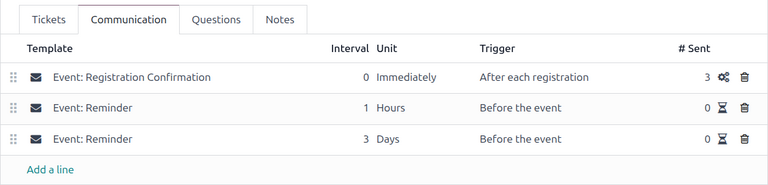
默认情况下,Odoo在每个新活动表单上提供三种单独的预配置沟通。一种是在每次报名后发送的电子邮件,用于与参与者确认购买。另外两种是电子邮件活动提醒,安排在活动前的不同时间间隔发送,以提醒收件人即将举行的活动。
To add a communication in the Communication tab, click Add a line. Then, select the desired type of communication from the first drop-down menu in the Template column. The options are: Mail, SMS, Social Post, or WhatsApp.
重要
只有在安装了**社媒营销**应用时,社交帖子选项才会显示。只有在安装了**WhatsApp**模块时,WhatsApp选项才会显示。
WhatsApp模板在配置生效期间无法编辑。需要Meta单独批准。
然后,从模板字段的第二个下拉菜单中选择现有的电子邮件模板。
接下来,从各自的下拉字段中定义间隔和单位,让Odoo知道何时应该发送沟通。单位选项包括:立即、小时、天、周和月。
Then, select one of the following options from the Trigger drop-down menu:
After each registration
Before the event starts
After the event started
After the event ended
Before the event ends
The (#) Sent column populates with the number of sent communications. Next to the number are different icons that appear, depending on the status of that particular communication. The Running status is represented by a (three gears) icon. The Sent status is represented by a (checkmark) icon. Finally, the Scheduled status is represented by an (hourglass) icon.
可以在活动表单的沟通选项卡中添加任意数量的沟通。
Example
要在参与者注册活动一小时后发送确认电子邮件,请配置以下沟通:
间隔:
1。单元:小时
触发器:每次注册后
注解
如有必要,可以直接从模板下拉菜单修改现有的电子邮件模板,方法是点击模板名称旁边的(内部链接)图标。这样做会显示一个单独的页面,用户可以在其中编辑该特定电子邮件模板的内容、电子邮件配置和设置。
To view and manage all email templates, activate 开发者模式(调试模式) and navigate to . Modify with caution as email templates affect all communications where the template is used.
问题选项卡
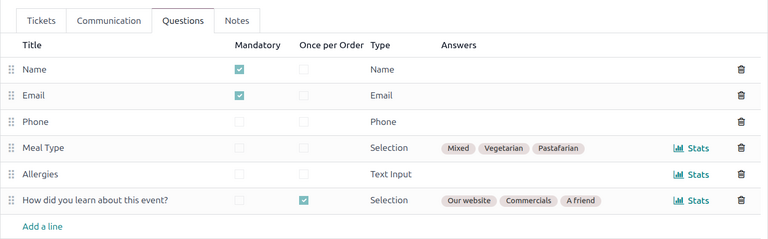
In the Questions tab of an event form, users can create questionnaires to gather information from attendees when registering for the event.
注解
By default, Odoo provides three questions in the Questions tab for every event form. The default questions require registrants to provide their Name, Email, and an optional Phone number.
从问题选项卡收集的信息可以在参与者仪表板上找到,可通过参与者智能按钮访问。Odoo会填充包含报名者基本信息及其偏好的个人记录。
To add a question in the Questions tab, click Add a line. Doing so reveals an Add: Question pop-up window. From here, users can select previously configured questions or click New to create a new one. Doing so opens a new Create Question pop-up window.
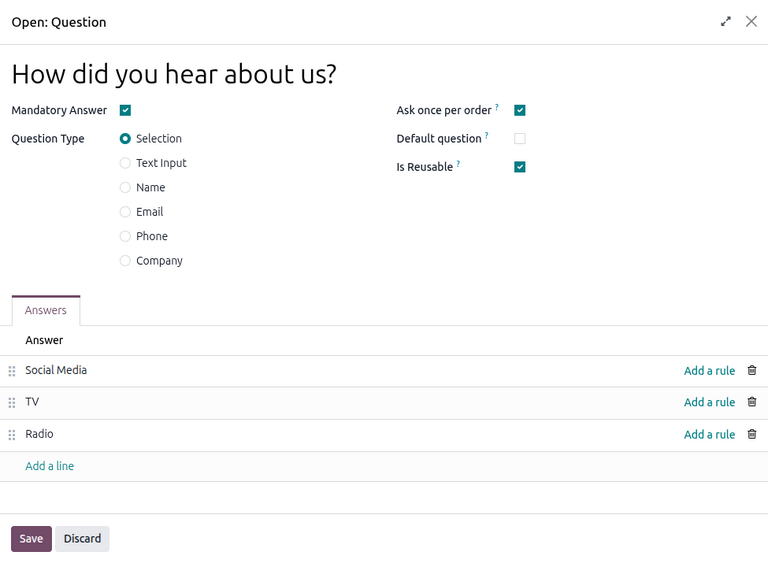
First, enter the question in the field at the top of the form. Then, specify if the question requires a Mandatory Answer.
接下来,选择 问题类型 选项:
选择:为问题提供答案选项供报名者选择。可选择的答案选项可以在弹出窗口底部的答案列中进行管理。
文本输入:允许用户在文本字段中输入对问题的自定义回复。
姓名:为注册者提供输入姓名的字段。
电子邮件:为注册者提供输入电子邮件地址的字段。
电话:为注册者提供输入电话号码的字段。
公司:为注册者提供输入其所属公司的字段。
Additionally, select one or more of the following options to configure the question’s visibility and extendability:
Ask once per order: Ask this question only once for each registration, applying the answer to every attendee in the order (if multiple tickets are purchased at once).
Default question: Automatically add this question for all new events.
Is Reusable: Allow this question to be reusable for all new events. If Default question is selected, this option is automatically enabled.
If Selection was chosen as the Question Type, an Answers tab appears. Add any answers to the question under this tab by clicking Add a line.
Once all the desired configurations have been entered, click Save & Close to save the question and return to the Questions tab on the event form. Or, click Save & New to save the question and configure another. To cancel, click Discard.
Users can add as many questions in the Questions tab as needed.
小技巧
对于 选择 和 文本输入 类型,问题行右侧会出现一个 统计数据 按钮。点击后,Odoo 会显示一个单独的页面,展示该特定问题的回复指标。
Notes & Documents tab
In the Notes & Documents tab of an event form, users can leave detailed internal notes and event-related instructions or information for attendees.
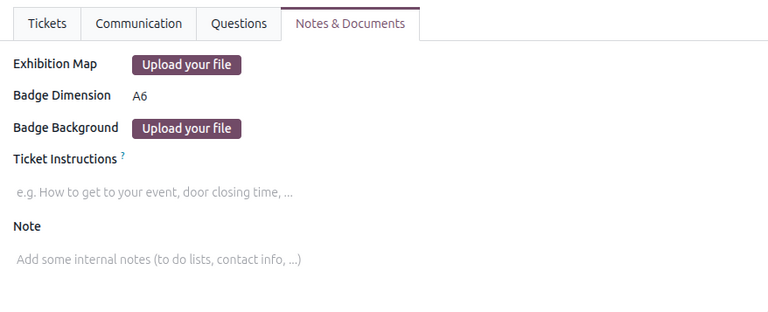
For in-person events, users can specify the venue map and attendee badge details in the following fields:
Exhibition Map: Upload an image of the event venue map. Do so by clicking Upload your file.
Badge Dimension: Select the desired paper format dimension for attendees’ event badges. The options are A4 foldable, A6, 4 per sheet, and 96x82mm (Badge Printer).
Badge Background: Upload an image of the custom background image for the badge. Do so by clicking Upload your file.
In the Ticket Instructions field, users can leave specific instructions for attendees and display them on attendees’ tickets.
In the Note field, users can leave internal notes for other event employees, such as “to-do” lists, contact information, instructions, and so on.
发布的活动
完成活动表单上的所有配置和修改后,就可以在网站上发布活动了。这样做可以让网站访客看到活动,并让人们有可能注册活动。
要在完成所有自定义后发布活动,请点击事件表单顶部的 转到网站`智能按钮。这样就会显示活动的网页,该网页可以像网站上的其他网页一样,通过 :guilabel:`编辑 按钮进行自定义。
要了解有关网站设计功能和选项的更多信息,请查阅构建块文档。
Once the event website is ready to be shared, click the red Unpublished toggle switch in the header menu, changing it to a green Published switch. At this point, the event web page is published and accessible by all website visitors.
发送活动邀请
要向潜在参与者发送活动邀请,请通过 导航至所需的活动表单,并点击进入所需的活动。然后,点击活动表单左上角的 邀请 按钮。
这样就会显示一个空白的电子邮件表单,可根据需要填写。要进一步了解如何创建和定制类似的电子邮件,请参阅 :ref:`创建电子邮件 <email_marketing/create_email>`文档。
继续创建和自定义电子邮件消息,作为邀请发送给潜在参与者。记得在电子邮件中包含活动网站注册页面的链接,以便感兴趣的收件人进行注册。
小技巧
从 Odoo 发送电子邮件受每日限额限制,默认为 200。要了解有关每日限制的更多信息,请访问 已达每日限额 文档。
其他资料