
餐厅功能
Odoo POS提供多种功能来管理餐厅或酒吧:
收取小费;
Three main buttons in the POS register allow for navigating between the Floor plan view, tables, and orders:
Plan: Access the Floor plan view.
Table: Enter a table or order number, then click Jump to access them. The button’s label updates to display the selected number. When applicable, click Book table to confirm the table’s occupancy.
(order): Create a direct sales order that is not linked to any table. Each click generates the next order in the sequence. Click Release Order to cancel the order (if no products have been added) and return to the Floor plan view.
注解
When Table Booking is enabled in the POS settings, a Booking button appears on the main interface for viewing and managing bookings.
Entering a number through the Table button that does not match an existing table number creates a direct sales order.
重要
To configure restaurant-specific settings, the Is a Bar/Restaurant setting under the Restaurant Mode section must be enabled in the POS settings.
楼层和餐桌
The Floor plan view is the first screen displayed when accessing the POS register. It enables managing restaurant floors and tables, and monitoring table status in real time (occupancy, reservations, and kitchen orders).
Example
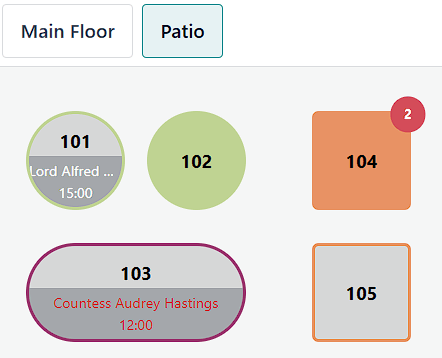
餐桌101:该餐桌目前可用,但已预订15:00。
餐桌102:该餐桌已预订,订单已发送到厨房。
餐桌103:12:00的餐桌延迟了。
餐桌104:该餐桌有待处理订单。
餐桌105:该餐桌可用。
配置
Creating floors and tables allows managing table selection and orders.
从POS后端
要从后端创建楼层和餐桌,请转到,然后点击新建。按照以下步骤配置平面图:
输入楼层名称。
选择相关的销售点。
您也可以将鼠标悬停在占位图像上,并点击)图标,为餐厅布局添加背景图像。
点击添加行以创建和配置桌台:
输入桌号。
填写座位数。
设置桌台的形状。
您也可以点击)图标以激活其他设置:
调整高度、宽度和颜色。
勾选激活复选框以使桌台可用或不可用。
保存。
注解
Enable the Table Booking setting to assign an Appointment resource and make a table bookable.
点击)图标以删除桌台。
小技巧
To create a Floor plan quickly, go to the Restaurant Mode section of the
POS settings. Under Floors & Tables Map, type the
floor name in the Floors field, and press Enter.
从 POS 前端
To create floors and tables from the frontend, open the POS register, click the (hamburger menu) icon in the top right corner of the Floor plan view, then Edit Plan. To configure the Floor plan, follow the next steps:
点击)图标以添加楼层。
输入楼层名称并点击应用。
点击)图标以选择背景颜色,或点击文件以上传图像。
您也可以点击)图标以重命名楼层平面图,或点击)图标以创建副本,或点击)图标以将其删除。
点击桌台以添加新桌台。要编辑桌台,请选中它并点击以下图标之一:
):添加或更改座位数。
)或):更改桌台形状。
):更改桌台颜色。
):更改桌号。
):使用下一个桌号克隆桌台属性。
(删除):删除该桌。
点击:guilabel:
保存。
警告
删除桌子或楼层是永久性的。
订单管理
To take an order, open the POS register and follow these steps:
Select a floor plan and click a table or click the (order) button at the top to create a direct sales order.
Add products to the order.
Click Order to validate the order.
准备好后,处理订单付款。
小技巧
To cancel a processed order, click Actions, then Cancel Order. If an order printer is configured, a cancellation ticket is automatically printed.
To switch to another table order, click the button with the table number at the top of the POS interface, enter a table number, and click Jump.
Click Release table to cancel a table’s occupancy.
配置打印机,以便在点击订单时将订单发送到厨房打印机。
订单转移
To transfer an order to another table from the POS interface, click Actions, then Transfer/Merge, and choose the target table in the Floor plan view:
选择一张可用的桌子以转移顾客及其订单。
选择一张已占用的桌子以合并顾客及其订单。
订单打印
配置
To enable sending orders to a kitchen or a bar printer, connect a printer to Odoo, go to the POS settings, and follow these steps:
向下滚动到准备部分,并启用准备打印机设置。
在打印机字段中输入打印机名称,然后点击创建并编辑。
在打印机设置表单中,选择打印机类型:
如果打印机连接到IoT 系统,请选择使用连接到 IoT 的打印机,并选择相关的设备。此过程需要 IoT 应用和 IoT 系统。
If using an Epson printer that does not require an IoT system connection, select Use an Epson printer and enter the Epson Printer IP Address.
通过在打印的产品类别字段中点击添加一行并从弹出窗口中选择首选类别,来定义要打印的产品类别。
点击 保存并关闭。
In the POS settings, click Save.
然后打印机连接到 POS,可以打印厨房订单和订单收据。
注解
打印厨房订单需要分配一个POS 产品类别。
要在添加:打印的产品类别弹出窗口中创建打印的产品类别,请点击新建。输入名称,选择一个父类别,选择一个颜色,点击(编辑)图标以添加图像,确定产品可用性,然后点击保存并关闭。
小技巧
To access all preparation printers from the POS settings, scroll down to the Preparation section, and click Printers. Alternatively, go to .
账单和付款
账单拆分
To allow bill splitting, go to , and enable Allow Bill Splitting under the Restaurant Mode section.
To split a bill from the POS interface, follow these steps:
Click Actions, then Split.
Select at least one product and click Split Order.
Proceed with the payment.
点击继续,并对每位客人重复此过程。
注解
拆分账单需要至少订购两个产品,并会创建一个子订单,必须在返回主订单之前付款。
Clicking Split Order without selecting any product creates an empty sub-order.
订单付款
To proceed with the order payment from the POS interface, follow these steps:
点击付款。
选择一个支付方式。
(可选)选择一位客户并向其发送发票:
点击客户以选择或创建客户账户。
启用发票以允许向客户发送发票。
点击验证。
收据打印
To allow receipt printing, go to , and enable Early Receipt Printing under the Restaurant Mode section.
成功订单付款后,点击打印完整收据以生成并打印账单。
重要
If a printer is configured and linked to a point of sale, the receipt is automatically printed upon payment confirmation.
其他资料
提示
配置
To allow tipping in a POS, go to the POS settings, scroll down to the Payment section, enable Tips, and click Save.
重要
The Add tip after payment setting only works for a POS in the United States of America with an Adyen or a Stripe payment terminal.
The Add tip through payment terminal (Adyen) setting only works with an Adyen terminal.
注解
Saving the Tips setting automatically fills the Tip product field with the preconfigured [TIPS] Tips product, which is only used for tips. When selecting another product in the Tip product field, the chosen product is no longer available on the POS interface.
每个 POS 只能选择一个小费产品。
小费和付款
要在付款期间处理小费,请按照以下步骤操作:
点击小费,添加金额,然后点击确定。
为订单和小费选择一个支付方式。
点击验证。
小技巧
If the order and the tip are paid using different payment methods, select a payment method for the order, click Tip, add the tip amount, and click Ok. Then, select a payment method for the tip and Validate the payment.
付款后小费(仅限美国)
To allow tipping after payment for a POS in the United States of America, ensure the Add tip after payment setting is enabled in the POS settings. To process tips after payment, follow these steps: